Automate Your Documents with Typst and Nix#
With just three tools, Typst, Nix, and Git, you can define exactly how you want a document laid out, exactly how you want it compiled, and exactly how it changes over time.
Here is the full list of advantages:
Reproducible Builds: If you don’t change something, your document doesn’t change. Every time you compile it, you get the exact same document.
Full Change History: Every change is stored in version control (Git) with commit messages and (hopefully) commit descriptions that tell you what changed and why.
Zero Vendor Lock-in: Once you define your document this way, you have complete control. It’s not locked up in obtuse data formats or clunky apps. You can edit it however you want, whenever you want.
Safe Collaboration: If you need to collaborate with others, you can rely on the safety of Git and use whatever branching and code review strategies that you desire. You don’t have to rely on some “multiplayer editing” feature with who knows how many bugs waiting to be found. Collaboration comes for free.
If you truly care about the documents you create, this method gives you the control you deserve.
The How#
We’ll start with creating a project directory and a Nix flake.
Warning
If you are using Nix flakes for the first time, you will likely have to add some configuration somewhere.
In my case, I have the line experimental-features = nix-command flakes saved in ~/.config/nix/nix.conf.
$ mkdir faux-business-card
$ cd faux-business-card
$ nix flake init
wrote: "~/faux-business-card/flake.nix"
Your new flake.nix should look something like this:
{
  description = "A very basic flake";

  inputs = {
    nixpkgs.url = "github:nixos/nixpkgs?ref=nixos-unstable";
  };

  outputs = { self, nixpkgs }: {

    packages.x86_64-linux.hello = nixpkgs.legacyPackages.x86_64-linux.hello;

    packages.x86_64-linux.default = self.packages.x86_64-linux.hello;

  };
}
Let’s rework this a little to get ready for what’s coming:
{
  inputs = {
    nixpkgs.url = "github:nixos/nixpkgs?ref=nixos-unstable";
  };

  outputs = { self, nixpkgs }: let
    systems = [
      "aarch64-darwin"
      "aarch64-linux"
      "x86_64-darwin"
      "x86_64-linux"
    ];
    lib = nixpkgs.lib;
    eachSystem = lib.genAttrs systems;
  in {
  };
}
Tip
A more common way of iterating through the default systems in a Nix flake would be to use numtide/flake-utils.
But I am using this lib.genAttrs method because its conceptually simpler for a beginner and it’s a useful pattern to know as you learn more Nix.
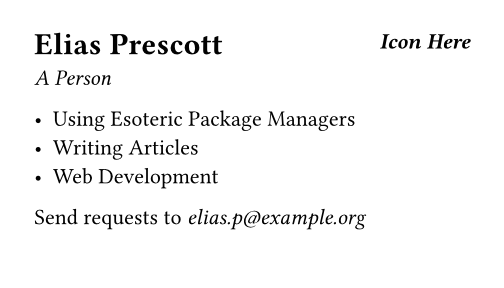
Now, let’s use Typst to create our example document in business-card.typ.
For documentation and tutorials on using Typst, visit the Typst docs.
#set page(
  width: 3.5in,
  height: 2in,
)

#columns(2, gutter: 8pt)[
  = Elias Prescott
  _A Person_

  #colbreak()

  #place(right)[
    _*Icon Here*_
  ]
]

- Using Esoteric Package Managers
- Writing Articles
- Web Development

Send requests to _elias.p\@example.org_
You could install Typst and run it directly, but how about we use Nix to do the dirty work for us? Nix flakes support development shell definitions directly in the base schema, and a custom development shell would allow us to install Typst and play around with it freely.
Tip
You can see the Nix flake schema here. The “Output Schema” section is particularly useful because it shows how the Nix flake output attributes correspond to the various Nix CLI commands.
Here is our updated flake.nix:
{
  inputs = {
    nixpkgs.url = "github:nixos/nixpkgs?ref=nixos-unstable";
  };

  outputs = { self, nixpkgs }: let
    systems = [
      "aarch64-darwin"
      "aarch64-linux"
      "x86_64-darwin"
      "x86_64-linux"
    ];
    lib = nixpkgs.lib;
    eachSystem = lib.genAttrs systems;
  in {
    devShells = eachSystem (system: let
      pkgs = nixpkgs.legacyPackages.${system};
    in {
      default = pkgs.mkShell {
        packages = [
          pkgs.typst
        ];
      };
    });
  };
}
Now, use nix develop to enter the development shell we just defined and run Typst.
$ nix develop
$ typst compile business-card.typ && open business-card.pdf
The PDF you just generated should look something like this:
Now that we know how to use Typst, let’s make a Nix package that wraps up this build process.
{
  inputs = {
    nixpkgs.url = "github:nixos/nixpkgs?ref=nixos-unstable";
  };

  outputs = { self, nixpkgs }: let
    systems = [
      "aarch64-darwin"
      "aarch64-linux"
      "x86_64-darwin"
      "x86_64-linux"
    ];
    lib = nixpkgs.lib;
    eachSystem = lib.genAttrs systems;
  in {
    packages = eachSystem (system: let
      pkgs = nixpkgs.legacyPackages.${system};
    in {
      default = pkgs.stdenv.mkDerivation {
        name = "faux-business-card";
        src = ./.;
        buildPhase = ''
          mkdir -p $out/share
          ${pkgs.typst}/bin/typst compile business-card.typ \
            $out/share/business-card.pdf
        '';
      };
    });

    devShells = eachSystem (system: let
      pkgs = nixpkgs.legacyPackages.${system};
    in {
      default = pkgs.mkShell {
        packages = [
          pkgs.typst
        ];
      };
    });
  };
}
The pkgs.stdenv.mkDerivation call is the key.
A Nix derivation is simply a definition for how to build a given package based on a set of inputs.
In our case, our “inputs” consists solely of pkgs.typst.
By interpolating pkgs.typst into the buildPhase attribute of our mkDerivation call, we are explicitly referencing the Typst package and telling Nix that Typst is an input to our derivation.
Nix defines $out as the path where the outputs of the derivation should go.
So once you create the $out directory, you can store any outputs you want in it or its sub-directories.
Now that we have a default package defined, we can use nix build to build it:
$ nix build && open result/share/business-card.pdf
After calling nix build, result will be a symlink that points to the derivation you just built in the Nix store.
You should be able to run ls -l to look at the result symlink and see where it points.
Remember how we put a placeholder for an icon in business-card.typ?
Let’s fix that.
Let’s say we found an icon that I really like in twbs/icons.
We are in luck, because fetching resources from a Git repository is a speciality of Nix.
# rest of file omitted for brevity
packages = eachSystem (system: let
  pkgs = nixpkgs.legacyPackages.${system};
  icon-pkg = pkgs.fetchgit {
    url = "https://github.com/twbs/icons.git";
    hash = "sha256-zYTTy3w7qW39kpwpqW59ZDBCgZEq+8djvobhz+ABwzA=";
    sparseCheckout = [
      "icons/person-arms-up.svg"
    ];
  };
in {
  default = pkgs.stdenv.mkDerivation {
    name = "faux-business-card";
    src = ./.;
    buildPhase = ''
      mkdir -p $out/share
      cp ${icon-pkg}/icons/person-arms-up.svg .
      ${pkgs.typst}/bin/typst compile business-card.typ \
        $out/share/business-card.pdf
    '';
  };
});
Tip
When you use a function like pkgs.fetchgit that takes a hash argument, leave the hash argument blank to start. When you evaluate the function call, Nix will see the blank hash, calculate the correct hash for you, and then throw an error containing the correct hash.
Then you can just copy and paste the hash in without having to calculate it manually.
Using sparseCheckout on fetchgit allows us to only grab the one file we need.
And we added that cp ${icon-pkg}/icons/person-arms-up.svg . line to the buildPhase to grab the icon out of icon-pkg and bring it into the current directory of our builder so that Typst can use it.
Here is what business-card.typ should look like now:
#set page(
  width: 3.5in,
  height: 2in,
)

#columns(2, gutter: 8pt)[
  = Elias Prescott
  _A Person_

  #colbreak()

  #place(right)[
    #image("person-arms-up.svg")
  ]
]

- Using Esoteric Package Managers
- Writing Articles
- Web Development

Send requests to _elias.p\@example.org_
$ nix build && open result/share/business-card.pdf

Now that we have the business card how we like it, we can clean up by initializing our Git repository and pushing it to GitHub.
$ git add .
$ git commit -m "initial commit"
$ git remote add origin git@github.com:EliasPrescott/faux-business-card.git
$ git push origin main
A neat side effect of putting our code in GitHub is now anyone can build our business card with one command:
$ nix build github:EliasPrescott/faux-business-card
Hopefully you enjoyed my (possibly crazy) method for generating documents. Thanks for reading!